How to Maintain SEO Rankings When Migrating to Squarespace
By: Ed Harris / Published: October 10, 2020 / Last updated: June 28, 2024

Migrating an existing website to a new platform can be a daunting task. In this guide, we’ll share a simple series of steps you can follow to avoid broken links or your rankings in search engine results pages taking a hit after the move is complete.
This guide focuses on the process of preserving links and SEO value when moving an existing website to Squarespace, since that’s the platform we work with most frequently at Blue Hills Digital. The tips below apply for:
- Website migration to Squarespace from other platforms like WordPress, Drupal, or Wix
- Website migration from Squarespace 7.0 to Squarespace 7.1
Before getting started, here’s an outline of the steps we’ll follow and when you should complete each step as you migrate your website to Squarespace:
Complete before you start setting up content on your new Squarespace website:
- Step #1: Get a complete list of all URLs on your current website
- Step #2: Download the crawl results and set up a tracking spreadsheet
As you set up content on the new Squarespace website:
Once you have finished setting up content on the new Squarespace website:
- Step #4: Use a formula to generate redirect rules
- Step #5: Copy and paste the redirect rules into the new Squarespace website
- Step #6: After the website migration is launched, monitor in Google Search Console
Now you’re ready to get started with your website migration!
Step #1: Get a complete list of all URLs on your current website
Most website builders include some built-in way to view a list of all pages or blog posts. However, we don’t want to use the built-in option here!
No. Instead, we want to see what Google and other search engines see. This is because the key to maintaining your website’s SEO rankings after a website migration is to ensure all the links in the previous website still resolve to the same (or very similar) pages after the move is complete.
To get a list of all URLs on your current website, we recommend you use a website crawl or website “spider” tool: our favorite is the weirdly-named Screaming Frog SEO Spider.
Don’t be put off by the name: the service is super-easy to use, and FREE for sites up to 500 URLs. Screaming Frog SEO Spider is a software package that you download to your computer and install as an application. Follow the download instructions here, and once you have the tool installed, open it up and plug in your website domain’s root URL, and click the “Start” button.
For example, to run a crawl of this website, you would enter https://www.bluehillsdigital.com as in the “Enter URL to spider” field.
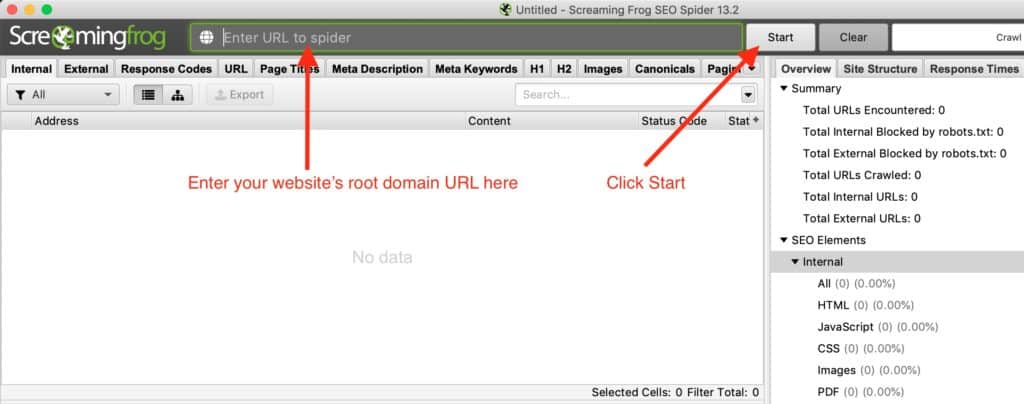
You’ll see the progress of the website crawl as it runs in the bottom right of the window. The crawl job will complete either when all the indexable URLs are crawled, or when the tool hits the 500-URL limit on the free version.
If your website has more than 500 URLs to crawl (it’s surprising how fast they add up), you can either pay for a Screaming Frog SEO Spider license (at the time of writing that’s GBP149), or get in touch and we can provide a one-time website crawl spreadsheet for significantly less!
Step #2: Download the crawl results and set up a tracking spreadsheet
Now we’re going to get into the details of tracking your website migration. In the Screaming Frog SEO Spider interface, click the “Export” button to download a CSV file containing your crawl results.
Open up that spreadsheet in Excel, or import it into Google Sheets — either solution works. Our goal now is to add some columns to the crawl results that will allow you to construct any redirect rules that you will need to create in your new Squarespace site before the migration goes live.
As a reminder, a redirect rule allows Squarespace to redirect a visitor that arrives at an old URL to a new URL. When search engines crawl your site, they will take note of redirect rules and learn where the content has moved to. In this case, we’re focused on “301 redirects”; redirect rules that indicate that a piece of content has changed location permanently. For a quick primer on how Squarespace handles 301 redirects, check out this support article.
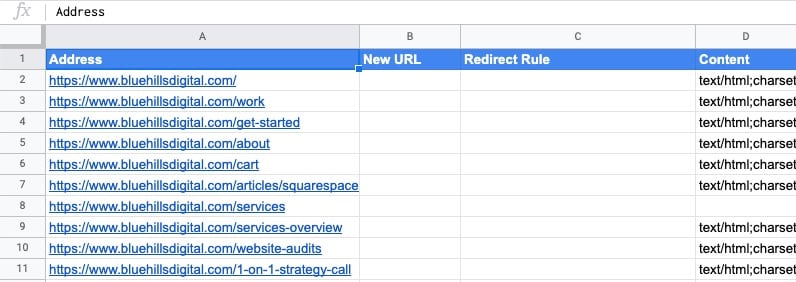
In your website migration tracking spreadsheet, you need to create two additional columns, immediately to the right of column A which contains the current URL for each page:
- New URL – this is where you’ll add the URL slug where the content will be located after the migration
- Redirect rule – we’ll use some formula magic to generate this in just a moment…
If this is set up correctly, the first three columns of your spreadsheet will look like this:
FREE URL Redirects Spreadsheet Template
Enter your email address to receive a free template spreadsheet that contains the Squarespace URL redirects formula described in this guide.
"*" indicates required fields
Unsubscribe at any time. Privacy Policy and Terms of Use apply.
Step #3: Fill out your new URLs
In the “New URL” column, enter the URL where the page will be located on the new website. There are two important notes about this:
- You only need to do this for pages where the URL will change. If the URL will stay the same after the migration, you can just leave the New URL cell blank for that row.
- Only include the portion of the URL after the root domain. You’ll see why in the next step!
For example, if the previous URL was:
https://www.bluehillsdigital.com/articles/squarespace-seo-checklist
and you decided to change the URL as part of the migration to:
https://www.bluehillsdigital.com/articles/ultimate-guide-squarespace-seo
then in the “New URL” cell you would only enter the part starting with the / after the root domain:
/articles/ultimate-guide-squarespace-seo

Step #4: Use a formula to generate redirect rules
Squarespace uses the following format to store redirect rules:
/old-url -> /new-url 301We’re going to use a fancy formula to create the text for every redirect rule you need on your new website. This formula works in both Microsoft Excel and Google Sheets.
=IF(B2>"",(CONCATENATE((right(A2,len(A2)-32))," -> ",B2," 301")),"")Wait! Before you paste this magic formula into the spreadsheet, we need to change one important detail. Right in the middle of the formula, the number 32 references the number of characters that need to be removed from the beginning of the current URL in the first column to leave just the portion after the root domain.
In the example shown here, https://www.bluehillsdigital.com is 32 characters long. Unless your root domain happens to be exactly the same length, you’ll need to change this number before you use the formula.
For example, if your website domain is https://www.example.com, you would switch the 32 for 23, like this:
=IF(B2>"",(CONCATENATE((right(A2,len(A2)-23))," -> ",B2," 301")),"")Ok. Once you have determined the character count for your root domain, go ahead and copy the formula and paste it into the first empty cell in the “Redirect Rule” column (Column C). Once you’ve pasted it, edit the formula to replace the character count with the number you determined above.

Don’t worry if nothing happens after you paste the formula! It will only create a Squarespace redirect rule in column C if you have entered a New URL value in column B.
Now we can fill the rest of column C with the formula, and for any rows where you have entered a New URL value, a Redirect Rule will magically appear!
- In Google Sheets, copy cell C2 (that contains the formula), highlight all the other cells in column C starting with C3 and ending with your last row of data, and paste.
- In Microsoft Excel, place your cursor on cell C2, and click and drag to highlight all the cells in column C, starting with C2 and ending with your last row of data. Then from the Edit menu, select Edit > Fill > Down to copy the formula down to all the other cells.
Once you’ve completed this step, you will see a Squarespace URL Redirect Rule appear in the C column on every row where you entered a new URL value.

Step #5: Copy and paste the redirect rules into the new Squarespace website
The final step is to move these Squarespace URL Redirect Rules into the URL Mappings panel in the dashboard for your new Squarespace website. Follow these steps:
- In your website migration tracking spreadsheet, highlight all the cells in column C (except the heading), and copy the contents to your clipboard.
- In your new Squarespace website dashboard, click on Home > Settings > Advanced > URL Mappings
- Paste the contents of your clipboard into the URL Mappings panel.
- Delete any empty lines resulting from spreadsheet rows where the URL did not change. Once you’re done there should be one URL Redirect Rule on each line.
- Click “Save”
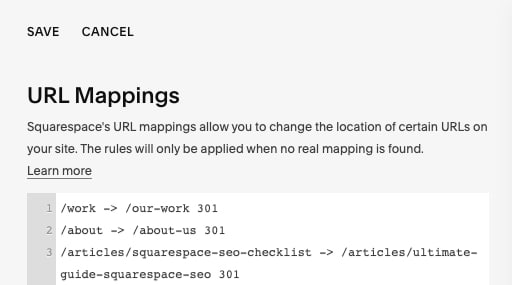
If you have a lot of empty rows without URL Redirect Rules, you may find it easy to delete the empty rows in a plain text editor before pasting the rules into the Squarespace URL Mappings panel.
Now you’re ready to migrate your website and feel confident that all your URLs will still resolve to the right content on the new Squarespace website.
Step #6: After the website migration is launched, monitor in Google Search Console
After you have completed the website migration and the new Squarespace website is live, you should monitor the new website for errors.
Google Search Console is your friend here! Check Step 13 of our Squarespace SEO Checklist for instructions on how to set up Google Search Console.
Monitoring Google Search Console over the first few days will reveal whether you missed creating any redirect rules, or if there are any previously indexed URLs that Google can no longer find after the migration.
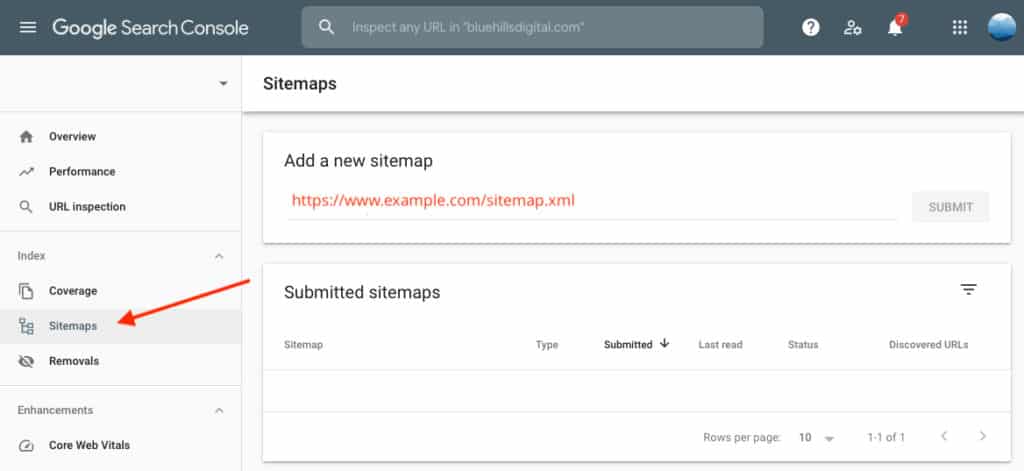
If you haven’t already, submit your Squarespace sitemap to Google Search Console to make it easier for Google to crawl your new website. Squarespace generates a sitemap automatically, and you can find this by adding /sitemap.xml to the end of your website’s root domain. Enter this URL into the “Sitemaps” section of the Google Search Console dashboard as illustrated below:
Bonus Tips
Use a website migration as an opportunity to improve technical SEO
Migrating an existing website to Squarespace is a great opportunity to conduct a quick technical SEO audit of all your site pages!
You’ll notice that the website crawl provided by the Screaming Frog SEO Spider also reveals what Google can see in the Title, Meta Description and Heading tags on each page. As you migrate content, make sure that every page, blog post, or product has appropriate content in those fields — it’s a great opportunity to improve the visibility of your content for search engines and the real people that use them!
Set up a Squarespace custom 404 error page
In the event that you miss creating a URL Redirect Rule, you can improve the user experience for visitors that end up following a broken link. Squarespace allows you to customize the “404 error page” that is shown to users that follow a link that Squarespace cannot find.
Set up a custom 404 error page to avoid showing users a generic and confusing error message. Instead, you can provide some links to the most popular content on your site, or share a direct link to contact you to find the content they’re looking for.
Creating a customized 404 error page involves creating a brand new, regular page from the Pages section of the Squarespace dashboard that includes the content you want to display. Once that page is saved, go to Design > 404 Page, and select the relevant page from the dropdown menu and click Save.
Advanced options for change the URL for Squarespace collections
Squarespace also allows you to create advanced URL redirect rules if you’re changing the name of an entire Squarespace collection (like blog posts, events, or products) but not change the URL slug of each individual item in the collection.
To create a collection URL redirect, you can use the [name] variable when creating the rule.
For example, if we wanted to change the collection URL for this post and all the others like it from …/articles/… to …/blog/… we could write a URL Redirect Rule like this:
/articles/[name] -> /blog/[name] 301Conclusion
We hope you found the tips in this guide helpful as you migrate your website to Squarespace. If you have questions or need additional support as you get started with Squarespace, get in touch!


